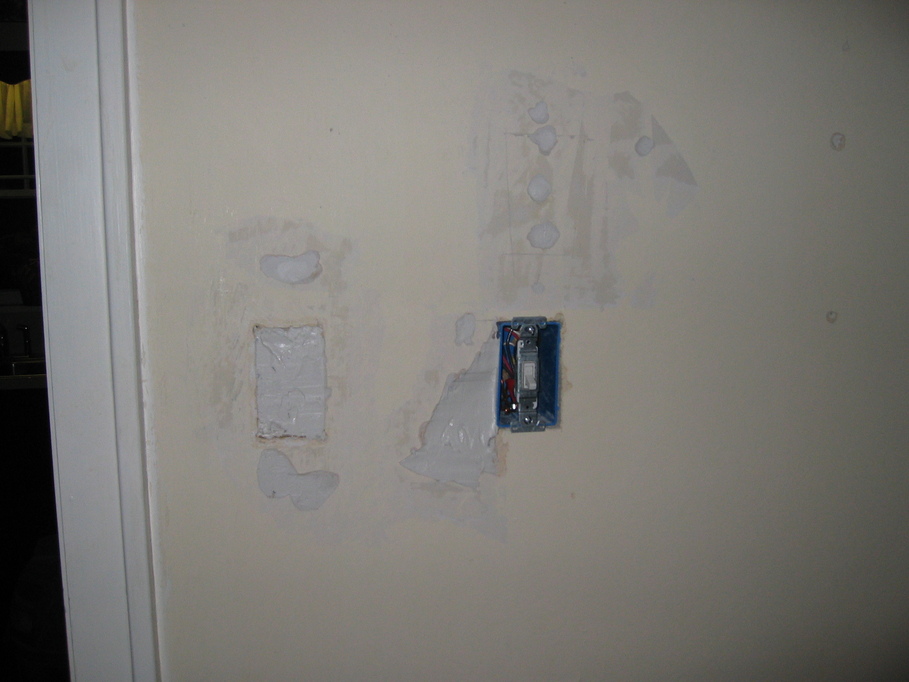
Another day, another demo. We covered the kitchen cabinets and
appliances with cheap drop cloths and paid our last respects to the
other side of the wall. Note the lack of any electrical outlets or
switches corresponding to the
boxes we found on the
other side of the wall.


Yikes! Of all the buried outlets we've found so far, this has to be
the worst yet. It was only covered by a thin layer of joint compound
over a cross of fiberglass tape and topped with wallpaper. And yes,
the wires were still hot!

The other box was more like the others we've found, but instead of
newspaper, this one was stuffed with a scrap of some terry cloth and
then covered with plaster. And yes, live, just like the other
(the wires are tied directly together).


So now I am definitely resolved to removing absolutely as much of the
old wiring as I possibly can even if it means ripping out all of the
plaster walls in the entire house. I probably can't remove
everything because the exterior walls are brick and tile and there is
little chance of getting new wires up to them, but all of the rest of
the old wiring must go, and I need to be reasonably sure that
there are no surprise boxes like this left when I'm done.
By dinner time, we'd made pretty good progress. At this point, I was
feeling pretty good about the whole thing. I think the room is going
to be much nicer with a bar/counter peninsula where the wall was.

After dinner, I got the crazy ass idea that I would do some
archaeology on the kitchen flooring, which was built up about an inch
over the original wood floors.

I obviously knew there was a top layer of thin composite plywood wood
flooring, and at some deeper level, old green tile squares. What I
didn't count on was that there were two layers of underlayment. The
first was 1/4-inch plywood under the green tile squares, and then a
1/4-inch layer of some kind of pressboard above it, with sheet vinyl
glued to it, and then the current wood layer firmly glued to the
vinyl, and both underlayment layers securely stapled down. At first
I thought I would pull up the current wood floor, then the sheet
vinyl and its layer of pressboard, then the tiles and plywood,
revealing a beautiful oak floor, just like we found in the rest of the
house. But that happy scenario was not to be. The wood floor was
much too securely glued down to the sheet vinyl, so I ended up cutting
into it with a circular saw and using a big pry bar to pull it up in
sections about three feet square.

And another complication was that the current cabinets were installed
on top of the green tile squares. In this picture you can see that
we've already moved the range and one of the cabinets out of the way.
This cabinet was only toenailed in to the cleat you can see on the
wall with two small finish nails. Is that normal? I'd hope not, but
in this house it seems that less than the minimum number of nails are
used for things like this while many more nails and staples than could
possibly be needed are reserved for things like holding flooring down
or for trying to eliminate squeaks in the floors (by driving lots of
large nails directly into the floor in the middle of a room, for
example).
But we pressed on and eventually uncovered most of the original floor.
Or, I should say, we uncovered the paper and glue that was stuck to
the original floor.


At some point that was far too late to turn back, we discovered that
this floor is not oak, and so doesn't match the other flooring on the
first floor at all. These boards are wider and are a softer wood,
maybe fir. I guess I should have suspected something was up
when I found out that these boards were wider than the others on the
first floor. Hmm.
Here is a closer shot of the glue, paper, and a small spot where I
tried some scraping and sanding just to see what would happen.

And here is a closeup of some of the two-inch ring-shank nails that we
discovered all over the floor. I guess this was done to try to stop
some squeaking? There must be more than 50 nails in various places.

Having fir floors might be OK, or at least usable for a while, but I
don't think there is any way we are going to be able to scrape this
glue and paper off with any reasonable amount of effort and without
completely destroying the wood. And then there are all the nail
holes. So I think we'll be completely replacing this floor, probably
with something other than oak, as a contrast to the rest of the
floors.
We will probably have to remove the cabinets to get the rest of this
flooring up (even just the old tile squares and the plywood
underneath). Our first thought was to just keep going and get on with
replacing the wood flooring, then put the cabinets back (or replace
them) etc. Pretty much a complete kitchen remodel. How's that for
project creep?
But now we're thinking maybe that's not such a good plan, and we
should just get the tile squares and plywood out and lay down
something to cover the floors, put the cabinets back, and get ready
for the outdoor work we have this summer, not to mention the remaining
projects we have in the second bedroom and den.
I guess we'd better start finishing a few projects before the house is
just a pile of rubble.
I'm sure we'll look back on this in a few years and laugh. I bet it
will be the best joke ever.
Here I am starting to open up the wall in the second bedroom so I can
run new wire to the outlets on both sides of this wall (the master
bedroom is on the other side). The second picture shows what it
looked like after most of the cutting was done but before I put holes
in the master bedroom side of the wall.


Here are some holes in the dining room and kitchen. I think I have
the walls open enough now to be able to run wire up from the basement
and to some new switches. The new switches will be for the dining
room light and lights over the future bar that we will be installing
between the dining room and kitchen. There will also be switches for
these lights near the other doorway between the kitchen and living
room.

Here's another reason we're doing all this demo. When we first moved
in to the house, the wire you see hanging out of the wall in this
picture was live (110V, at least a 15A but maybe a 20A breaker) and
strung across the basement between the floor joists and the old
dropped ceiling tiles. One end went up in the wall and the other end
came out of the end of some flexible metal conduit thing, very similar
to the other BX wire we have in the house except that this wire is
about 20 gauge stranded wire, twisted and all the other old BX wire is
14 gauge solid copper wire. I found it very odd that this kind of
wire would be connected to 110V.
I still don't know what it was for, or exactly where it ends up except
that it goes up the wall into the second floor at least. Maybe it
goes into the attic room somewhere. If so, then it will be a while
before we know where it terminates because the attic is finished and
we probably won't be doing any demo up there for at least a year,
maybe longer.
Before I pulled it out of the wall at the point shown in the picture,
the wire was running between a stud and a metal heating duct
(converted to a return air vent some years ago) and the insulation was
brittle and falling off in spots. Yikes!